
VW T25 T3 Vanagon full-width rear bed platform fitting guide
- Combe Valley Campers

- Jan 18, 2022
- 3 min read
Updated: Feb 9, 2022
If you haven't bought your platform, you can find details here

Building the unit inside of the van is strongly recommended due to its weight and good fit when built.
STEP ONE

Take piece 'A' and place it into the van with the rebates facing the rear of the van.
Take piece 'B' and line it up with the inner rebate. Make sure that the holes cut for the hinges on piece 'B' are located towards the top.

Using the 30mm T20 Spax screws, fasten the two 'B' pieces to the inner rebates marked in piece 'A'.
STEP TWO

Take piece 'C' and line it up with the Outer rebate. Position the arch in piece 'C' is towards the rear of the van and facing downwards.
Using the 30mm T20 Spax screws, fasten the two 'C' pieces to the outer rebates marked in piece 'A'.
Once you have fitted the two outer 'C' pieces your unit should resemble the image below.

STEP THREE

Pieces 'D' and 'E' combined creates the lip that fits on the reverse side of Piece 'A' This is what your Rusty Lee full-width Rock N' Roll bed will rest on in the 'bed position'.

Install pieces 'D' and 'E' so they interlock and the straight edge is the outside edge.
Using the 30mm T20 Spax screws, pieces 'D' and 'E' screw from the reverse side of piece 'A' using the last remaining pilot holes.
STEP FOUR

Line up piece 'F' with the two 'C' and 'B' pieces. The Routed out lip on 'F' is the top.
Using the 30mm T20 Spax screws, Fix the two 'C' pieces and two 'B' pieces to the aligned rebates marked in piece 'F'.
This mainframe will now fit tightly in the van.
STEP FIVE
You can build this out of the vehicle for some extra space!
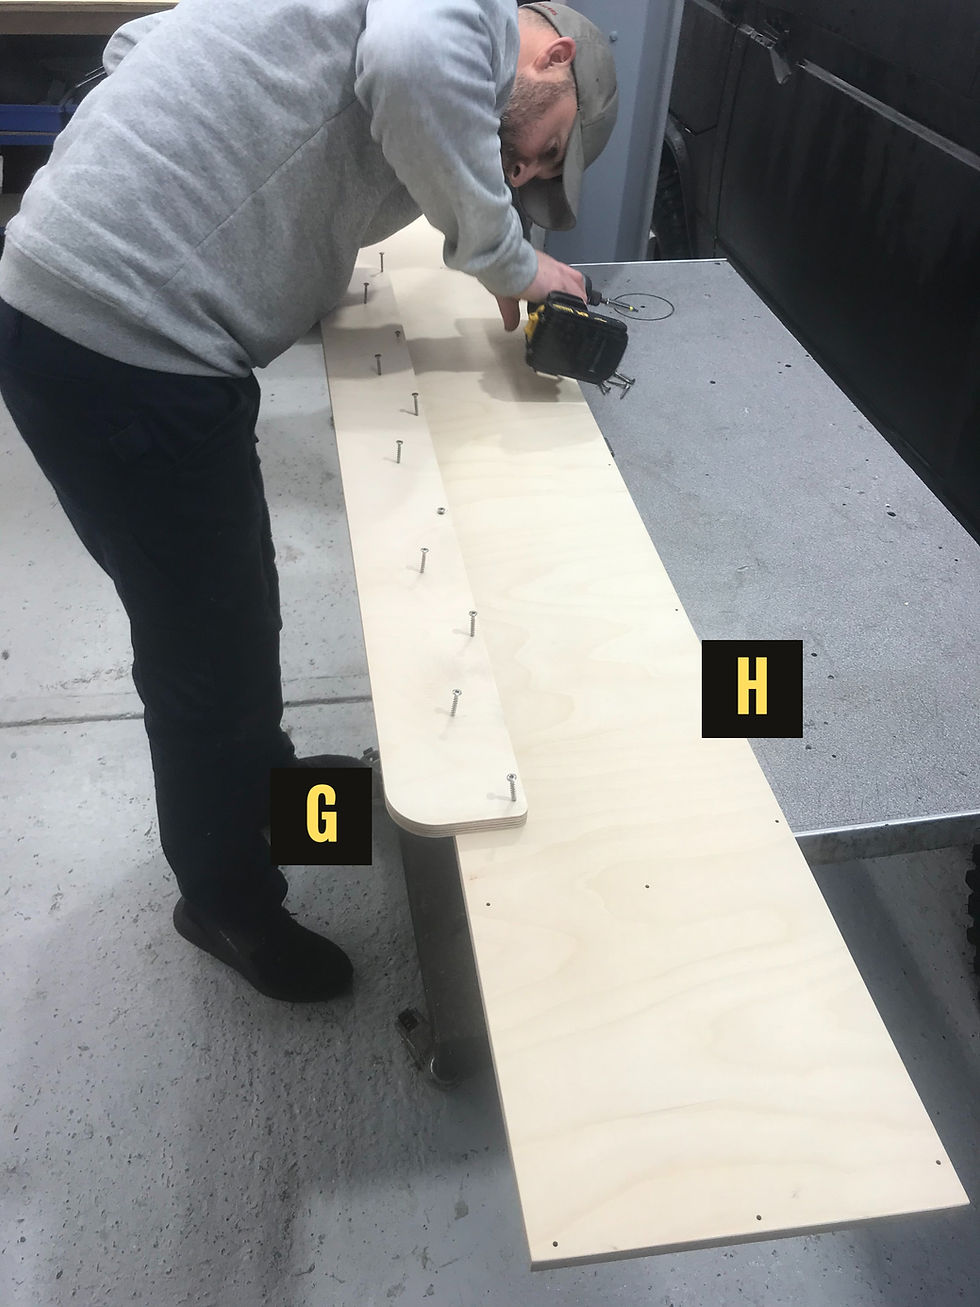
Place piece 'G' on top of piece 'H' there will be 11 pilot holes that line up. Using the 30mm T20 Spax screws, half screw two or three of the screws so you know they have lined up. Once you are happy they are aligned proceed to fully tighten the screws.

STEP SIX
Now that you have connected pieces 'G' and 'H' together flip it over so 'G' is on the underside.

This 'G+H' piece will sit as the lid closest to the rock n' roll bed. (Over piece 'A'). Before it is fastened make sure all four corners line up as seen in the photo.
Once you have lined the pieces up you can fasten the screws through piece 'H' into the mainframe.

STEP SEVEN

You will need; 4x M6 Pan head bolts, 4x M6 washers, 4x M6 Nyloc nuts, 1x 4mm Allen key and 1x 10mm spanner.

Open the bracket and line up with the pre-drilled holes located in piece 'C' push the M6 pan head bolts through the bracket and Piece 'C' from the inside.

On the reverse side then thread on the M6 washer followed by the Nyloc nut.
Once both are on hand tight you can proceed to tighten them with your 4mm Allen Key and 10mm spanner.

Once you have finished one side, repeat the same process on the opposite side.

STEP EIGHT

Piece 'I' can now be placed onto the unit. The lip should be at the top with the four pilot holes lining up with the brackets at the bottom.

You will need; 4x M6 countersunk bolts, 4x M6 washers, 4x M6 Nyloc nuts, 1x 4mm Allen key and 1x 10mm spanner.

Piece 'I' is countersunk. Thread the bolt from the wood side first finishing at the bracket.

Now you can thread on the M6 washer and then fasten an M6 Nyloc with your 10mm spanner. Use the 4mm Allen key on the other side to stop the bolt from spinning.
STEP NINE

The final step is to fit the two side storage lids.
You will notice on parts 'J' and 'K' that there is one side that is wider than the other. the 'L' piece will be attached to the wider side. Using the pilot holes and ensuring the curved edge is facing outwards.
Piece 'M' can then be fitted to the opposing sides.


An IPL Betting ID is the easiest way to dive into the world of cricket betting with confidence. Designed to be beginner-friendly, it allows new users to register quickly and start placing wagers without complications. Security is a top priority, ensuring that your personal details and transactions remain fully protected. The process is fast, with instant access to live odds, match updates, and betting markets, so you never miss out on the action.
Begin your programming journey with our expert-led Python classes in Pune. Designed for beginners, this course offers hands-on training, real-world projects, and the skills you need to kickstart a tech career.
Ethical Hacking Training in Pune offers hands-on learning in cybersecurity, focusing on penetration testing, network security, and ethical hacking techniques. This course equips students with the skills to identify vulnerabilities and protect systems from cyber threats, making it ideal for aspiring cybersecurity professionals.